Godot - Asteroids Game For Complete Beginners: 4
Back
Previous Article: Godot - Asteroids Game For Complete Beginners: 3
Next Article: Godot - Asteroids Game For Complete Beginners: 5
Author: Yiannis Charalambous
Reading Time: 8 minutes
Tags: Tutorial · Godot
Introduction
This is part 4 of the tutorial series for making an asteroids style game in Godot, designed for absolute beginners with little to no experience in programming.
This article will cover:
- How to make the asteroids slowly move towards the player ship.
- How to make the asteroids spawn around the player ship.
Before going through this article, it is recommended following the steps outlined in the previous parts of this tutorial series.
Moving the Asteroids
This section will cover how to make the asteroids move towards the player ship.
Begin, by opening the asteroid script (code/Asteroid.gd). The additional
script variable will need to be declared:
|
|
The move_dir variable will tell the asteroid which direction to move. When the
asteroid is spawned, it will be set to move towards the player ship. Along, with
the variable comes this method:
|
|
In the asteroid’s physics process method, the position is updated by delta
multiplied with the move_dir variable we set earlier. The move_dir
variable’s default value is Vector2.ZERO, this will make the default state of
the asteroid stationary. So the asteroids placed manually will not move.
Spawning Asteroids
In order to make the asteroids spawn around the player ship randomly, we can
create and use a dedicated node that will be responsible for selecting a random
position outside of the screen, spawing an asteroid node, and then setting it’s
move_dir to point to the ship. Create a new script in the code folder with
the name AsteroidManager.gd that will inherit from Node. Additionally create
a new 2D scene like with all the previous nodes. Name the root node as
AsteroidManager and save it at objects/AsteroidManager.tscn. Additionally,
attach the script to the root node, by dragging it from the FileSystem panel to
the root node in the Scene panel. Open the AsteroidManager.gd script and edit
it so that it contains the following code:
|
|
Perhaps this is the longest script in the entire project, however, when broken down, it is simple to understand. The following script variables are declared:
@export var spawn_rate : float = 2: This is the value thatspawn_rate_leftwill be set to when a new asteroid is created.var spawn_rate_left : float = 0: This variable represents a timer, when it reaches0, the AsteroidManager will spawn an asteroid, then this value will be set back tospawn_rateand the process will begin again.@export_node_path(Node) var target_path : NodePath = "": The target path holds a value which allows us to get the target. This value can be set from the Inspector panel when the AsteroidManager node is selected.var target : Node = null: This represents the target that this AsteroidManager will direct the asteroids to, in this case it is the player ship, this will be initialized using thetarget_pathvariable that will be set from the Inspector panel.var asteroid_scene : PackedScene = preload("res://objects/Asteroid.tscn"): Holds all the information required to create an asteroid object.var asteroid_speed : float = 150: How fast the asteroids will move when spawned.var spawn_distance_offset : float = 500: This controls how far from the center of the screen the asteroids will spawn.
The _ready method is the smallest and simplest method in the entire script, it
first calls randomize which is a built-in method that causes all calls to
functions that return random numbers back to be truly random. It then sets
spawn_rate_left to the value of spawn_rate so that an asteroid doesn’t
immediatley spawn (allowing the player to prepare). Finally, it calls the
built-in function get_node_or_null passing the target_path variable as a
parameter, this function returns a reference to the object that target_path
points to, which in practise, will be the player ship. So an easy way to
understand this is (although it is a little bit more complicated than this),
target_path points to the player ship and target is the player ship.
The _process method starts by first checking if target has not been set in
the _ready method, then exits the method, this is because the game will crash
if we attempt to use target for anything if it is set to null, which it will
be unless changed in the _ready method. If it is null, then it is because
target_path is not pointing to the ship. The rest of the method is very
similar to the _process method of the player ship script, as it is another
timer. This time the purpose of the timer is to countdown and when it reaches
0, it will spawn an asteroid by calling the spawn_asteroid method.
The _spawn_asteroid method checks the _process method, if target is null
it exits the method, if it is not it uses the target variable to tell the
asteroids to target it.
It does so by first calling the instantiate method on the asteroid_scene
variable, as the variable is a PackedScene which means that it holds all the
information on how to create a new asteroid. The newly created asteroid is
assigned to the asteroid variable. The asteroid’s position is then set to the
Vector2 variable that the function get_new_asteroid_position returns. This
method will be covered later. The variable offset is then assigned the value
representing the difference in positon between the target and the asteroid. This
value is then normalized and
assigned to the move_dir of the asteroid (the script variable that we created
earlier when making the asteroid). The asteroid is added to the scene by calling
the add_sibling method.
The get_new_asteroid_position method is perhaps the most difficult to
understand due to its heavy use of vector maths. It begins by assigning size,
the value obtained by calling get_viewport().size, size is a variable that
belongs to a Viewport object obtained by calling get_viewport(). This
represents the width and height of the window. The idea is to select a position
outside of the viewport. The value returned by the function randf_range is
assigned to rand_ang, this function will return a random value in the range of
0 and 2π (π is being represented by PI in GDScript). This will represent a
random direction to spawn the asteroid in. The center of the viewport, that is,
the center of the screen is assigned to center.
Then the spawn location is obtained through two steps. Firstly, the
spawn_offset is calculated which is the direction from the center of the
screen that the asteroid will spawn from. This is done by calling the rotated
method on the constant Vector2 value called Vector2.RIGHT which is
equivalent to typing Vector2(1, 0). The rotated method is passed the random
angle number that was calculated previously. The result is then multiplied by
the variable spawn_distance_offset. This effectively gets a random direction
away from the coordinates (0,0), the next step translates those coordinates to
the center of the screen. spawn_offset is added to center. The result is
then returned by the function. This method may be a bit hard to understand, it
is not necessary to understand it on the first read, perhaps it is worth
revisiting this article in a few days.
Before starting the game, it is important to remember to place the
AsteroidManager object in the level first, drag and drop it from the
FileSystem panel, it doesn’t matter where as it is invisible, doesn’t interact
with any objects, and does not use it’s position for anything. It is also
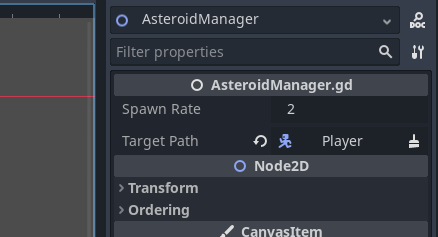
critical that the target_path variable is set, this can be done by selecting
the AsteroidManager node placed in the scene (either through the Scene panel
or through the viewport), once selected, the Inspector will reveal all the
Node’s properties. As observed, the target_path variable created in the script
is now exposed in the inspector allowing us to set it. When clicked, we can then
select the player ship as the target.
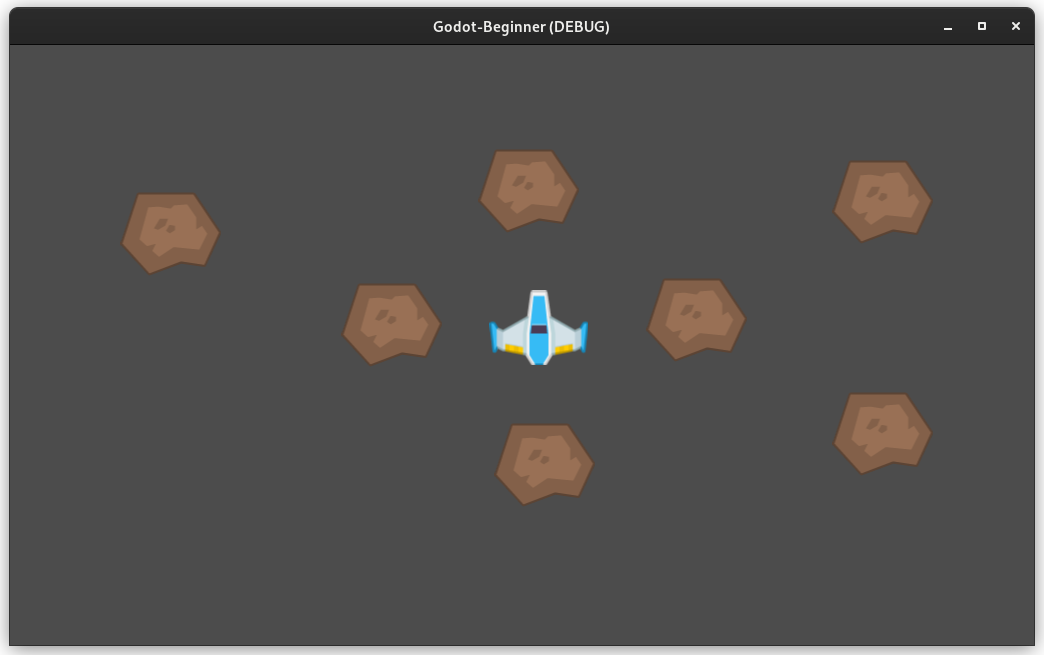
After all this, running the game will show that the asteroids are being spawned now and are targeting the player.
Project Files
The project files for this tutorial can be accessed on GitHub. You can use these files as reference material if you get stuck while following the tutorial.
Useful Links
What’s Next
Part 4 covered a lot of topics that may not have been fully explained, it is recommended that you read the articles in Useful Links in order to better understand them before moving to Part 5.